

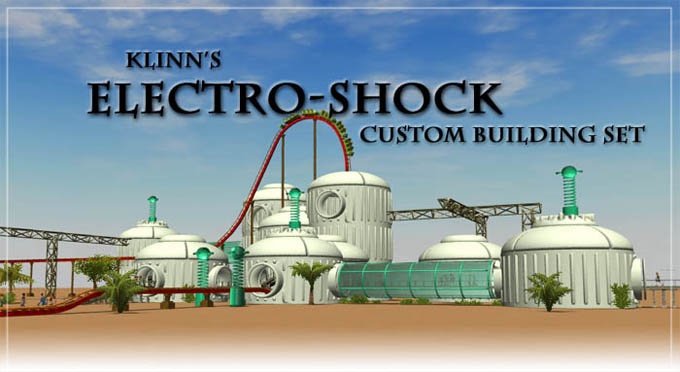
This is a set of custom walls, roofs, and other odd bits created for use with Roller Coaster Tycoon 3. Many of the pieces were originally created for my ‘ElectroShock Coaster’ but I’ve added a few new ones too. If you want to see what these custom buildings look like in action, there are some video clips here on my site.
Custom scenery has only become possible thanks to the hard work of JonWil, who analysed RCT3’s files and created utilities to import objects into the game. A huge round of applause should be sent his way.
Creating and using custom RCT3 objects is still at the experimental stage. While these parts have been tested and should not cause any problems, by using them you are assuming all risk should something corrupt your Roller Coaster Tycoon 3 installation or your parks. Don’t expect any help from Atari or Frontier if things go bad, they will not support a game modified with third-party fan add-ons. Only use this set if you are comfortable mucking around with RCT3’s files. These custom parts were developed and tested on the North American retail release of Roller Coaster Tycoon 3 complete with the Soaked expansion. They should work just as well on other versions, but there are no guarantees. If you’re not confident in your ability to recover from tinkering with RCT3’s files, then don’t.
Still with us? OK, below are tips on how to install and use the custom wall set.
Save the ElectroSet Setup program anywhere on your computer and then double-click it to install the custom building set.
To uninstall the set, go to the Windows Control Panel and double-click "Add Or Remove Programs". Select "Klinn's ElectroSet Version 2" from the list and click the "Remove" button.
After deleting the custom scenery’s folder, if you load a park which included items from the set, it should load OK but of course the custom buildings will be gone.
Start up a new sandbox park or new custom scenario and open the walls section of the scenery list. Make sure you don’t have the Sci-Fi theme filtered out, since that’s where my ElectroSet appears. Scroll down through the wall sets until you see ‘Klinn’s ElectroSet’.
If you are trying to use the items in an old park or old custom scenario, not a new one, by default the objects are set ‘To Be Invented’. They will not appear until your researchers discover them. If you want them to be available immediately, you’ll have to make a slight change to the park with the Scenario Editor:
    - Open the park with the Scenario Editor.
    - Click the ‘Set Up Inventions’ button.
    - Select all the ElectroSet items in the middle column.
    - Click the green arrow under the right column to move the items there.
    - Save the park.
By putting the ElectroSet objects in the ‘Available From Start of Game’ column, you’ll be able to use them right away, you won’t have to wait for them to be invented in the game. When creating a new custom scenario, remember to put them in the column you wish, depending on the scenario objectives and restrictions you are setting up.
Once you can see the Klinn’s ElectroSet group, open it up and you’ll see the pieces included:
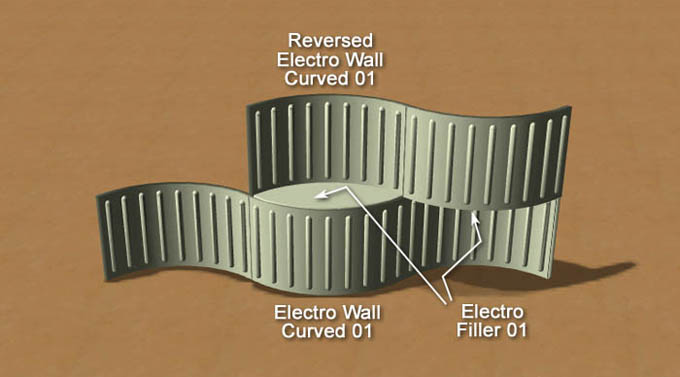
    - Electro Wall Curved 01 - a basic curved wall.
    - Electro Wall Curved 02 - as above but with a circular entrance.
    - Electro Roof Curved 01 - fits on top of either curved wall.
    - Electro Roof Curved 02 - used where two roofs come together.
    - Electro Roof Cap 01 - plugs the hole in center of curved roof sections.
    - Electro Roof Cap 02 - same, but shows where to place Electro Post 01 on top.
    - Electro Filler 01 - if use reverse-curve walls, fills in gap.
    - Electro Tube 01 - fits between one Electro Curved Wall 02’s opening and another.
    - Electro Tube Frame 01 - place over top of tube to ‘support’ it.
    - Electro Tube 02 - fits between two regular RCT3 walls.
    - Electro Tube Frame 02 - place over top of tube to ‘support’ it.
    - Electro Girder 01 - vertical triangular framework section, stackable.
    - Electro Girder 02 - horizontal framework section, add more sections onto ends.
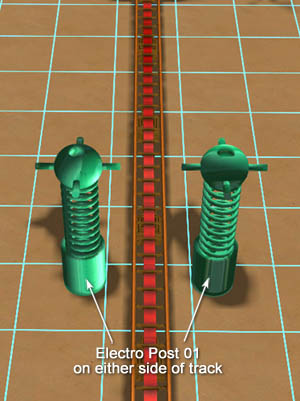
    - Electro Post 01 - vertical electrical post, can add firework effects.
    - Electro Post 02 - horizontal electrical post, can add firework effect.
As you select and place the custom objects, you’ll see a couple of differences compared to the normal RCT3 items.
First, while you’ll get a ghost image of the object itself, there’s only one blue square on the ground to help you gauge its position. To get around this, I sometimes swing my viewpoint almost directly overhead and get the object in the right spot, hold the left Shift key down while swinging my viewpoint back down to ground level, and slide the object up and down as required. It can be a little tricky when working on a large building, try not to curse the custom objects too much.
Secondly, there is no collision detection - you can place the objects anywhere but on a path, even overlapping each other. While it opens up some interesting possibilities, this can make it harder to stack wall sections. They won’t jump up to the top of the previous one; you’ll have to raise them to the right height yourself.

Four of the curved walls make a complete circular building, but there are many other ways of combining them. You can flip a wall around so it curves the other way and it will match up with other walls. If you place a reverse-curve wall above a regular one, there will be a gap between them. Fill this in with the Electro Filler 01 panel. The same filler works up under a curved roof that overhangs a reversed wall.
The centre hole in a roof can be filled with either style of Electro Roof Cap. These can be positioned so they’re snuggly fitted into the roof, or raised one notch to reveal a ring detail. Electro Roof Cap 02 has some ribs on it to help show where an Electro Post 01 can be positioned on top. I tend to leave the roof caps off until after I build walkways or coaster tracks through the buildings. In fact, you can even thread a steep or vertical coaster track right through the center hole.

The Electro Tube has two parts, the translucent glass and the tube framework. Place one of each in the same spot to complete the set. Tubes can connect walls that are various distances apart by floating closely in between or overlapping as needed.
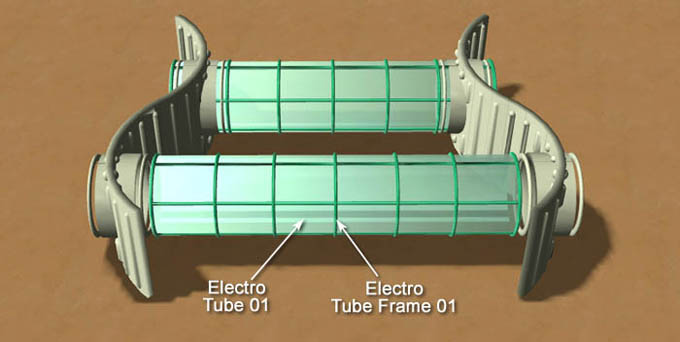
You may notice that when roller coasters go through the tubes, the coaster cars disappear. The peeps are still there, so it looks like they are floating along the track. Looks fine when riding the coaster, it’s only from the outside that the cars temporarily disappear.
The vertical Electro Post 01 occupies a quarter tile. This allows you place a fireworks mortar within it to make the ‘electrical discharge’ effect. Use the ‘KLN-ElectroPost01.frw’ firework and attach it to the mortar. If you place two of these posts close together, on either side of a coaster track for example, you can hide a fireworks mortar in the top sphere of one post and have it shoot an electrical effect over to the other post. Use either the ‘KLN-ElectroPost02-0.frw’, ‘KLN-ElectroPost02-90.frw’, ‘KLN-ElectroPost02-180.frw’, or ‘KLN-ElectroPost02-270.frw’ firework depending on which direction (angle) the effect should travel.

Electro Post 02 fits between two closely spaced buildings, either with or without circular openings. Hide a mortar inside and use ‘KLN-ElectroPost03-0.frw’, ‘KLN-ElectroPost03-90.frw’, ‘KLN-ElectroPost03-180.frw’, or ‘KLN-ElectroPost03-270.frw’ to get the electrical discharge effect across the post. Again, which fireworks effect you use depends on the direction (angle) you want it to travel.
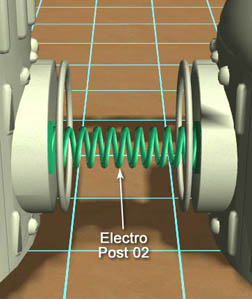
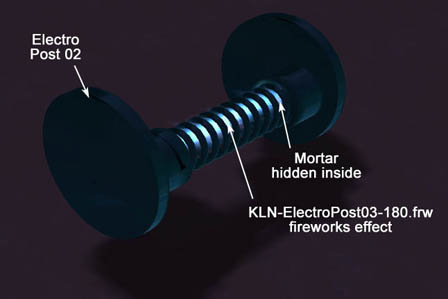
Any time you place a mortar, you’ll have to make sure it’s on the right quarter tile to line up with the Electro Post. It takes a bit of practice until you get used to it.
The two girder sections are pretty easy to use. Just stack the vertical one (Electro Girder 01) as high as you want. The horizontal one (Electro Girder 02) can be extended by adding sections onto either end. To finish the end that doesn’t have the triangle of struts, just flip the last piece around so it overlaps the previous section. Like all the custom objects, there is no collision detection, so you can overlap pieces freely, embed them in walls or the ground and so on.
If you would like to try your hand at making custom scenery, be sure to visit the Atari RCT3 Custom Scenery forum and look for JonWil’s threads. They contain all the information you need to get started. Hopefully as the community builds up more experience, some tutorials will be written to help guide folks through the process.
Please feel free to pass along the Setup file of the custom building set, or to host it on your web site, so long as it is not done for profit. Please include the ReadMe file so that other players will know how to use the set. You may wish to link back to this page so people can look over the set before downloading it.
If you have any problems or suggestions, please send me a PM at the Atari RCT3 forums. My user name is ‘Klinn’. Or send an email to Klinn AT Designamatic DOT com.
First and foremost, major props to JonWil, who somehow managed to decode much of RCT3’s file formats and create an incredibly useful Importer utility. Wouldn’t it be nice if you sent him a PM at the Atari RCT3 forums expressing your thanks? If you want to learn how to build your own custom RCT3 objects, be sure to check out JonWil’s threads in the Custom Scenery Atari RCT3 forum.
Thanks as well to many of the Atari forum regulars who have been experimenting with custom objects and sharing their experiences and information. In particular, Pumper, Marnetmar, Guybrush, and Miss O have helped clarify many things that puzzled me as I built the ElectroSet. In addition, there are forum members too numerous to mention whose enthusiasm and interest in this project kept me plugging away at it.
And finally, thanks to Frontier and Atari for creating such a fascinating game that just keeps getting better!

Yes, you can now recolor the custom walls, roofs, and other objects just like any other RCT3 scenery item! The walls are intentionally done in pale shades of the color you select, while the Electro Posts are darker and shiny.
If you already have a park using the old ElectroShock buildings, download the new Setup file and install it. This will automatically overwrite the old walls, roofs, etc, with the new versions. When you open a park that contained the old buildings, you'll probably find most of them are colored medium grey. Use RCT3's "Paint Colors Onto Objects" tool to quickly recolor lots of building blocks and other pieces all at once.