
The moment of truth. Everything is hooked up, do we have ignition? Woo-hoo, the POST screen comes up and I go into the BIOS to set it up. Poke around the options for a minute or two, and the system locks up. Not so good. Rebooted, reset the CMOS RAM, no luck. Now there's no video at all. Arrgh.
Well, if there’s no video, let’s try another card. Fortunately I have an ancient 3dfx Voodoo PCI card stashed away, so I dig that out and swap it for the 8800GTX. I’ve got video again, as the motherboard does its auto-recovery of the bad BIOS configuration. But within a minute, the system locks up again. Double-arrgh.
Maybe it’s the memory. While looking around on the web for help, I discover that higher speed RAM like mine should really be set for more than the default DDR2 voltage, specifically 2.1 instead of 1.8 volts. But how to get into the BIOS long enough before it freezes again? Another bit of advice suggests using just one stick initially. This lets the system get through the POST and into the BIOS setup. I crank up the voltage and set the timings needed for my RAM, reboot and it’s still working. Yippee! I put the second stick back in and it freezes again. Annoying, but I think the problem is becoming apparent. I swap RAM sticks, putting just the other one in and the system freezes. Put just the first one back in and it works fine. Looks like one stick is bad. Oh well, I’ll make do until I get a replacement.
(Update: got the replacement pair of Corsair sticks and they work fine. They are slightly faster than the OCZ memory I was using while waiting, but the difference is probably not really noticable outside of benchmarks.)
Time to install Windows XP. Man, it takes a long time to format 500GB!
First thing to do is some stress testing of the CPU and memory, both to make sure everything is working OK and to check the resulting temperatures. I’ll use Johnny Lee’s Orthos Blended test to load the system, plus the Asus Probe 2 and Arthur Liberman’s Core Temp utilities to monitor temperatures, and finally Franck Delattre’s CPU-Z to verify BIOS settings.

I’ve tested the system for over 10 hours in total with no apparent problems. The CPU temperatures reported in Asus Probe 2 are known to be too low, you should add 12-15 degrees Celsius to them. I believe a BIOS update is coming that will fix this. Given that, the CPU temps are within reason, but the motherboard seems much higher than normal. It ranges from 36-38 degrees Celsius at idle to 43-45 degrees under the blended orthos test. I even saw a peak of 47!
Using the old Mark-IV hand test, I didn’t feel any excessively hot components or exhaust air, but this was worrying.
Browsing the Asus forums, it was apparent that this is a common issue. The temperature sensor is placed very close to the power regulation circuitry for the memory and picks up more heat. Asus claims that temps under 65 degrees are fine. Just to ease my mind, I may try to increase air flow to that area, it’s in kind of a dead spot under the top corner of the CPU fan.
While testing, it became apparent that the Antec case fan, even on its medium setting, was noticeably noisier than the Scythe CPU fan. Fortunately I had bought an extra, so I took out the TriCool and replaced it with the 1200 rpm S-Flex. Yes, this meant ripping out my ever-so-clever installation of the speed switch under the power supply. Oh well. The difference in noise was readily apparent, while the volume of air moved and internal temps remained the same.
Compared to my old Dell 8300, the new system seems only about half as loud. That’s a very unscientific approximation, but gives some idea of the difference.
According to the free version of 3DMark05, the new system is about three times faster than my old Dell 8300, and 3DMark06 rates it about four times as fast.
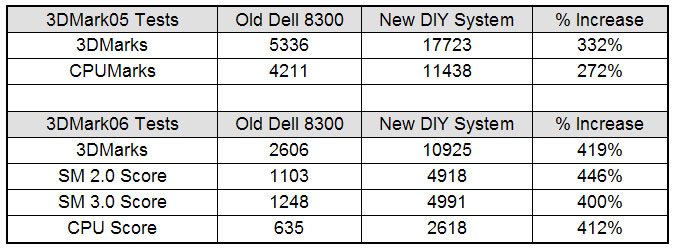
The Dell 8300 was a decent machine in its day, a 3GHz Pentium4 with 2GB of memory and upgraded to an AGP nVidia 7800GS video card. But technology marches on.
So much for synthetic benchmarks. I also installed a number of games to test. The latest patch for each title was applied. Most notably, Flight Simulator X had the SP1 patch installed, which significantly improves frame rates.
I tried to keep the graphical and game options as similar as possible. For some reason, I cannot create a custom 1280x800 screen resolution in the nVidia control panel. I used that relatively low rez widescreen format for most games on my old system in order to get satisfactory frame rates. The closest I could use for comparison on the new system was 1280x1024. So when you look at the results below, remember that the new system is actually throwing a few more pixels up on the screen.
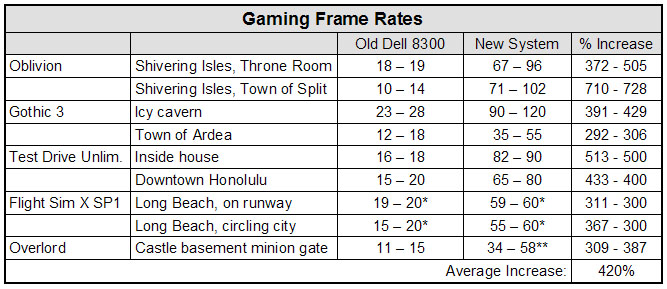
* Note that for FSX, the frame rate target was set at 20 for the Dell 8300, and 60 for the new system. I expect to lower that to about 30 FPS when reconfiguring the game’s options to suit the improved performance, i.e. pushin’ them detail sliders further to the right!
** During my first tests at 1280x1024, Overlord's frame rate appeared to be capped at 30 FPS. Now it can go a bit over 60 despite the fact that I bumped it up to 1920x1200 and 4X anti-aliasing. Weird. It was almost like a half-speed VSync. Anyway, I've used the new figures in the chart above.
One additional benchmarking note: I upgraded the video driver from the version supplied with the graphics card to the latest WHQL-certified one (162.18) and the 3DMark06 score went up by 4.6% to 11424 3DMarks. Not enough to really be noticable, but a step in the right direction.
The speed increase over my old Dell is quite delightful, but let’s see what kind of an overclock we can do without excessive fiddling and while staying with air cooling.
I tried a simple overclock by setting the FSB to 400, producing a CPU speed of 3.6GHz, and ensuring the memory was set for DDR2-800 instead of “Auto”. I left the VCore at “Auto” to see what voltage the BIOS would use.
There were no problems at all booting or with Windows, or even in the Orthos Blended test. Nice and stable. CPU temps were up about 4 to 8 degrees Celsius and the motherboard stayed the same. The system was running at 1.352 VCore. There has been some discussion in forums that the “Auto” setting adds too much voltage, opting for working overclocks at the expense of higher temperatures. So it may be possible to dial that back a bit and reduce the heat. The results:
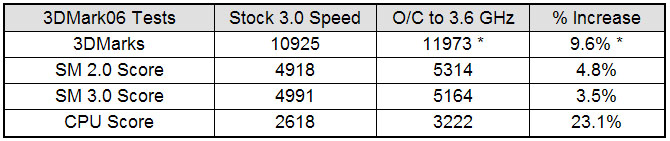
* Note that about half of this increase is probably due to the new nVidia 162.18 drivers.
Allowing for the new video drivers, the 20% overclock appears to give about a 5% better 3DMark score. The CPU score is more in line, but it seems that I may be lucky to get about 10% better performance in games. In exchange, the system runs hotter with a potentially shorter life span. I’ll do some more testing in actual games, but so far overclocking doesn’t seem worth it, except maybe for bragging rights.
By the way, to get started in overclocking, I found Clunk’s guide at the Hexus forums to be very useful. He even has another version devoted to the Asus P5K motherboards.
Quad core: When it proves to be beneficial in many games, I’ll switch. The upcoming Penryn-based CPUs promise to be cooler and/or faster. I’ll wait until they become common enough that prices come down.
Graphics card: Rumours abound that nVidia’s next generation of video cards will be significantly faster for both DX9 and DX10 games. And hopefully AMD/ATI will get back in the game and offer decent competition at the high-end. I expect this system will go through several video card upgrades over its lifespan.
Vista: Surely at some point Microsoft et al will work out the problems with gaming under Vista and DX10. If the performance hit and incompatibilities are resolved, I’ll probably switch.
