
When the courier dropped off all the boxes, of course I had to go through them all and admire the nice shiny new components. I was surprised at how small the motherboard looked. It’s the standard ATX size, but I’ve only seen them inside systems with all sorts of stuff plugged in, so I guess I imagined it would be bigger. On the other hand, the nVidia 8800GTX video card is huge! Time to figure out how to fit it in.
I stripped off everything I could from the case, added the rear I/O shield and brass standoffs, then test fit the motherboard and video card.

Here’s a close up showing where the card overlaps one of the drive bay supports.

Unfortunately, using this motherboard, the 8800GTX overlaps one of the clips for the hard drive suspension “bungee cords”. That will have to go, leaving only two spots to suspend drives. I don’t expect I’ll ever add more than one extra drive anyway, but it’s a shame to disable some of the functionality of the case.
After a little bit of snipping, a notch is born. I angled the cuts so they would intersect with the rounded hole. For safety’s sake, I added small black rubber guards over the sheet metal edges using material intended for car door edges. Some small tubing slit open would work too.

Woo-hoo! My first case mod! A pretty lame one, but whatever. An excellent guide to working with sheet metal to make mods to computer cases can be found in the SilentPCReviews forums.
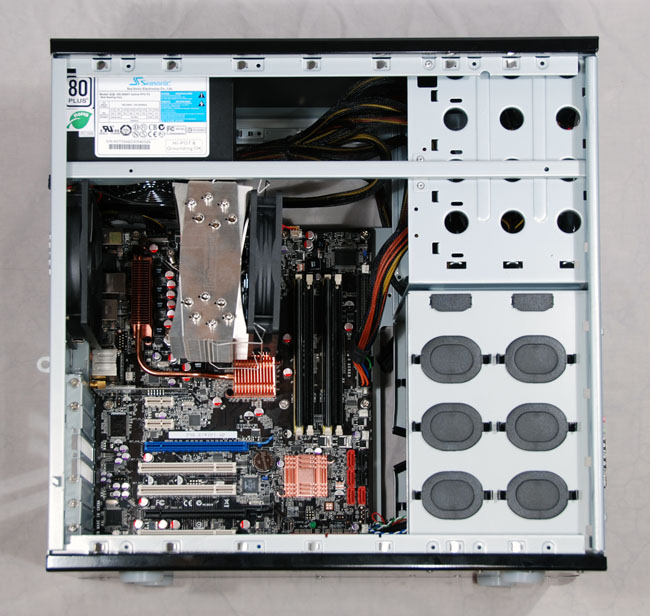
Next up is the power supply, because of course we really need even more cables cluttering up the interior. Fortunately the Solo case’s wire management features should help tidy this up later.

The power supply is secured with four screws at the back. Be sure to check the position of these before slipping the unit into place. Don’t assume that all four are located in the corners, two of mine were not.
The rear fan of the Solo case is connected to a 4-pin Molex plug rather than to the motherboard. A separately-wired 3-way switch controls the fan speed. I looked around and re-read the manual, but there doesn’t seem to be a specific spot in the case to hold the switch. I would have thought there would be a press-fit opening on the back or something. It appears the switch is just supposed to be stashed away somewhere inside. This means you would have to open the case to adjust the speed.
I noticed that there was a small gap under the power supply, so I stuck the switch’s flat wire through there. Now the switch can be reached from the back of the computer with no need to open it up. The power supply effectively clamps it in place. The relocated switch is circled in red in the shot below.

The Tri-Cool fan is supposed to be pretty good, but if it turns out to be too noisy I’ll replace it with a Scythe 1200 rpm fan plugged into the motherboard.
Since the Ultra-120 Extreme heat sink has a back plate, it must be attached while the motherboard is out of the case. This was the part of the build that I was most apprehensive about. Would I get the proper amount of thermal goop in the right place? Would the heat sink make contact correctly? Last thing I wanted was a brand new CPU going up in smoke. After multiple readings of the instructions and careful fiddling, it at least looks OK. I’ll find out for sure later when electricity is added to the mix. The Artic Silver cleaning solution really helped to remove some minor gunk from the base of the heat sink, not to mention my partial fingerprint from the CPU heat spreader.

Since the heat sink screws are spring-loaded, I found it easier to attach the first one on the opposite side from where you’re sitting. Then when you put in the second one on your side, which applies tension through the springs across the CPU, you can more easily see how it is fitting into the retaining bracket. Once the first half of the bracket is in place, the other side is easier. I put all four screws in lightly at first, then tightened them up in a crisscross pattern to balance the force. Well, it’s a good theory anyway.
Sharp-eyed readers will note that the fan is installed backwards, that is, it's pulling air through the heat sink instead of pushing it. Oops. Fortunately I discovered this before powering up the system.
Well, how about that. It actually fits. But it’s so tight that one of the spring clips which holds the CPU fan in place had to be squeezed under the case’s cross brace. In retrospect, I should have installed them so they overlap the heat sink more instead of sticking out.
The Solo case came with a giant bag of screws but no indication of which were used for what. The ones used to secure the motherboard turned out to be some of the shorter ones with a coarse pitch. There are some almost identical ones that have a finer thread and I nearly used a couple of them by mistake.
The extra 8-pin motherboard power connector was a pain to fit in because there isn’t much space between the back panel, power supply, and CPU heat sink. By the way, those fins on the heat sink are sharp enough to cause a few scratches. Ask me how I know.
I decided to put the hard drive right at the bottom of the case. One or two fans can be added in front if needed, but I'll see what the temperatures are like before adding more potential noise sources.

The hard drive is mounted in a pair of elastic “bungee cords” rather than the usual drive trays. The case does come with four trays as well, but using this system instead is supposed to further reduce the amount of noise from the hard drives.
For initial testing, I’m not going to install the sound card, so the video card is the last component to add. It’s getting full in there.

The cabling could use a little more cleaning up. One of the nice features of the Solo case is the cable management system. With the other side panel off, you can reach a number of hooks on the far side of the drive bays to wind extra cables around.

After making sure everything is actually working, I’ll probably try to make better use of these hooks. Getting cables out of the main body of the case should improve air flow to that hot CPU and graphics card.
Now it’s finally time to fire it up and take delight in my first DIY system coming to life!
