
Iím going to use the Money Pit scenario again for this tutorial. Bring up the FCR Editor window and start a new route. If youíve still got the Editor window open from our previous tutorial, just click the New Route buttonís drop shadow to clear the last route and begin a new one.
When creating a curved route in the FCR Editor, you are setting points (camera positions) and the Editor attempts to calculate a smooth Bezier-type curve (route) through those points taking into consideration the direction of travel and which way the camera is pointing. In other words, it does a certain amount of guessing about your intentions. Sometimes those guesses work out, sometimes not. When the result is not quite right, youíll have to adjust the control handles (markers) manually. Thatís what this tutorial will focus on.
Weíre going to create a route curving around a 90-degree corner. The only camera positions we really need are the start and finish of the curve. Generally speaking, the fewer camera positions the better. More positions may let the program make better guesses about the curve you want, but it also means more chances that the camera will Ďbobbleí at an intermediate position. Learning how to use the markers to adjust the route is ultimately much easier than creating a ton of points all along the curve.
Enough talk, letís roll! Move your view close to where we started last time, above the path near the washroom facilities. Click the ĎSí button to set the start of our camera route.

Now rotate and move your view so youíre looking up the path heading towards the western wheel. Click the ĎEí button to add that position to the end of the route. The camera position icons will appear on the timeline.

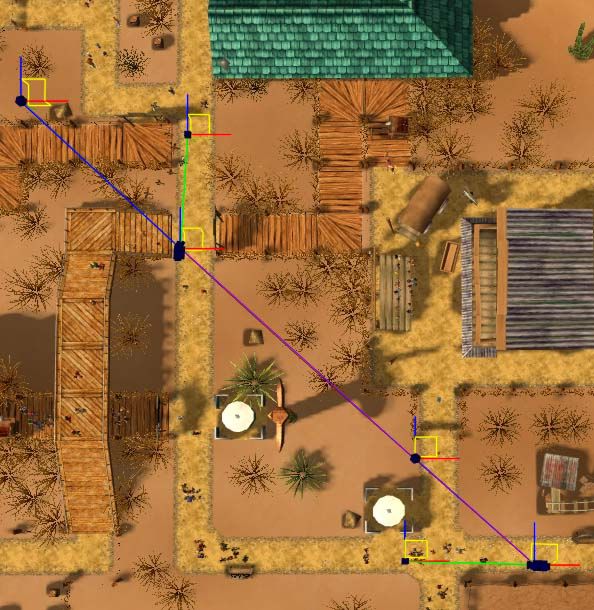
Click the Play button to see our route in the mini preview window. What the ??? That sure isnít the nice smooth curve we wanted! Letís see what the FCR Editor calculated for us by adjusting our view so weíre directly above the route, looking down at it.

Now you can see why the preview was so wonky. The route is a straight line from the start position to the end, with only the direction of the camera view changing. Time to adjust some markers.
Look at the end camera position. The marker at the end of the blue line controls the direction the camera is moving at that point, and therefore influences the curve needed to reach that direction. Itís sticking off at a weird angle; we want the direction to be following the path.
Grab the yellow box attached to the marker and drag it over so itís aligned with the path.

Notice how that part of the route is now curved, but we can now see that the movement direction marker for the starting camera position also needs to be adjusted.
We want the camera to initially travel down the first path before turning, so that positionís movment direction marker should be aligned with the path.
Grab the yellow box of the marker at the end of blue line and move it down to match up with path.

Thatís much closer to what we wanted, itís now a nice smooth curve. Play the preview to see the improvement. Not bad, but it turns in too soon, so we end up flying over the toilet facilities.
You can adjust how shallow or deep the curve is by dragging the movement direction markers closer or farther away from the camera position.
Grab the yellow box on the end of each movement direction marker and stretch it out away from the camera.

The curve is now wider, missing the infamous facilities. Now try playing the preview again. Much better!
When you create more complicated routes with multiple curves, you may find you have to adjust the direction markers for several camera positions to make the curve look right. You might even have to move the camera position itself to make a smooth flowing curve.
When fiddling with these, sometimes their position may end up too high or low, or the camera may end up looking too far up or down. To adjust this, swing your viewpoint down and around so youíre looking at the route sideways, then grab and move the markers. Remember that you can set the timeline so itís at a specific camera position, which lets you keep an eye on the mini preview window to see the effects of any adjustments.